Mortise Gauge: Parts Name, Uses, and Working
Published: 15 Nov 2025
In woodworking, precision is everything. To achieve perfect joints and smooth-fitting parts, professionals often rely on a simple yet powerful tool, the mortise gauge. This essential marking instrument helps craftsmen draw accurate parallel lines on wood surfaces, making it easier to create clean and durable mortise and tenon joints in carpentry projects. In this article, we will discuss what a mortise gauge is, its main parts, how to use it, and its common applications in woodworking.
What is a Mortise Gauge?
A mortise gauge is a specialized marking tool used to scribe parallel lines for mortise and tenon joints. It ensures both parts of the joint fit together perfectly, giving the structure strength and stability. Typically made from hardwoods such as rosewood with brass fittings, the mortise gauge is both durable and precise. One of its two pins is adjustable, allowing carpenters to set the correct distance according to the mortise chisel size.
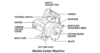
Mortise Gauge Parts Name
A mortise gauge is made up of several key parts that work together to ensure accuracy:
Stock (Fence): The main wooden body that rests against the edge of the workpiece for stability.
Stem (Beam): The long bar attached to the stock that holds the marking pins.
Pins (Spurs): Two sharp metal points that mark parallel lines on the wood.
Adjustable Slide: Allows one pin to move, setting the width of the mortise.
Thumb Screw: Used to lock the pins and keep the measurements fixed.
Brass Fittings: Add durability and a smooth sliding action to the tool.
Each part plays a vital role in ensuring precise marking for woodworking joints.
How to Use Mortise Gauge
Using a mortise gauge correctly helps you achieve neat and even joints. Here’s how to do it:
- Set the Pins: Adjust the space between the two pins according to the width of the mortise chisel.
- Lock the Measurement: Tighten the thumb screw to secure the setting.
- Position the Gauge: Hold the stock firmly against the edge of the wood.
- Mark the Lines: Slide the gauge smoothly along the grain to create two parallel lines.
- Double-Check: Ensure the lines are clean and accurate before cutting.
- For the best results, apply gentle and even pressure — too much force may damage the wood surface.
Mortise Gauge Uses
- Marking out mortise and tenon joints for strong and precise connections.
- Essential for woodworking projects like doors, windows, chairs, and tables.
- Ensures accuracy and strength in furniture and frame construction.
- Some mortise gauges have a retractable pin, allowing their use as a regular marking gauge.
- Useful for general woodworking tasks, such as outlining grooves or marking drill positions.
Conclusion
A mortise gauge is more than just a marking tool. It’s a precision instrument that helps achieve perfect alignment in woodworking joints. Whether you’re a beginner or a professional carpenter, mastering this tool ensures accuracy, quality, and durability in every project. With the mortise gauge in your toolkit, you can bring craftsmanship and perfection to all your woodworking.


- Be Respectful
- Stay Relevant
- Stay Positive
- True Feedback
- Encourage Discussion
- Avoid Spamming
- No Fake News
- Don't Copy-Paste
- No Personal Attacks
- Be Respectful
- Stay Relevant
- Stay Positive
- True Feedback
- Encourage Discussion
- Avoid Spamming
- No Fake News
- Don't Copy-Paste
- No Personal Attacks
